The weather is starting to better, the days are getting longer and it’s finally time for another installment of your favorite Warhammer blog series. This was the first full month many of us had our Warhammer: The Old World minis and as you are about to see, we made a ton of progress, if not a lot of painting progress….
Michael S.
This month I spent more time than I hoped assembling models.
The Stone Age
I am naturally a bit slower than most when it comes to the building and painting process. I absolutely HATE seeing mold lines on a mini while I am painting, so my excitement to build some retro models lasted about 10 minutes, or as long as it takes to trim horrendous mold lines from a single skeleton torso. Many years of building modern kits has spoiled me on what I consider a long clean-up job for a mini, so after crawling across the finish line for my first 10 skeletons, I knew I had to change something about my process.
The Industrial Age
Knowing I had to build another… checks notes… 62 skeleton warriors drained me of most of my remaining excitement. I was in for the long haul and there was no turning back.
One of the few redeeming qualities of miniatures made in the 90s/2000s was the ability to mix and match parts. Very few pieces were numbered, and all you had to do was glue some arms to a body and that body to a base. It wasn’t until somewhat recently that mono-pose kits became the norm much to the displeasure of kitbashers everywhere. Another bonus of these interchangeable parts was that there was ALMOST no way to assemble your minis incorrectly. With this in mind, I pulled out my heavy duty clippers and got to work clipping out all the remaining skeleton spearmen. After about 15 minutes of focused work, I was left with my very own homemade box of citadel skulls!

My gameplan here was to streamline the process by building them all at once in an assembly line.
- Clip out all the parts
- Use a sharp hobby knife to cut away any extra material left from the sprue
- Use a dull hobby knife to scrape away any mold lines
- Use some fine sandpaper to smooth out any harsh lines left by previous steps
- Assemble
With a plan in place, I wasted no further time. I trimmed each piece, and moved it to the other side of the bin. Each step only used a single tool, so I didn’t have to worry much about picking up and putting down the same tool hundreds of times over the course of the whole kit.

This was the most time consuming part of building, but if you want great looking models, you have to start with a cleaned miniature. This is even more important for older models where the molds aren’t in great condition. The images below show a before and after of some pretty severe mold slips. That’s definitely going to leave a mark if not addressed in assembly. You’ll notice a few mold lines on the spine that just aren’t worth the effort, but the legs trimmed up nicely.


Mold lines that follow sharp edges on the model are often missed. I find taking a few seconds to clean these adds a lot to a mini’s final appearance. Edge highlights on super sharp edges (Like the shield on the right) have a tendency to be unnaturally thin compared to even a razor thin edge highlight on more rounded corners. Making sure all of your “sharp” edges are similar in shape makes it easier to get a good consistent edge highlight. Since the shields are going to be a major focus of these soldiers, it pays to take a little extra time now to prep them.

Once I took my final pass on all the parts, I sorted them as I went into small bins to keep parts of each type together. This made the assembly stage fly by. All in all I was able to assemble the other 30 spearmen in about 9 hours from start to finish. While it is by no means blazing fast, I am reasonably happy with the amount of time I spent given I was able to make all but a few mold shifts completely disappear.

From here on out, the rest of the process felt like assembling a lego kit.

The Information Age (Learning From My Mistakes)
Don’t play tomb kings.
Just kidding! Despite my desk being covered in a fine dusting of plastic shavings, ranking up my first two squads of warriors brought back all of my excitement and more. With larger projects, it easy to lose sight of the end goals, so breaking it down into smaller chunks really helped me stay motivated.

Tools For Retaining Your Sanity
Flash Scraper
Throughout my build of my Tomb Kings army, my most valuable tool has been a very dull hobby knife. A dulled blade is the perfect tool for scraping at mold lines, and is much less likely to damage a part then a sharp blade is. I have tried several other tools, including some dedicated micro deburring tools and have yet to find anything that is as easy to use and effective as a dull hobby knife.
Extra-Thin Plastic Cement
Some textures are just plain awful to clean if a mold line runs over them. In particular, plasma coils and rib cages come to mind. My preferred method for quickly tackling these is a quick light scrape with my dull hobby knife and some extra-thin cement. Brushing over just a tiny bit is usually enough to melt any shavings stuck in the detail and help hide the join.

Rubber Bands
Another useful tool was a handful of rubber bands in various sizes. Some parts, particularly the Skeleton Horses, just don’t want to stay together. Snapping a rubber band around parts as they dry helps speed up the assembly line process of building immensely. The Necrolith dragon also benefits from the added pressure to keep the ribcage together as it dries.
Other Projects
I sadly did nothing else this month except clip, sand and assemble tiny small skeletons.
Austin B.
February Progress?
Unlike the others, I have had to build fairly little this month. Between the fact that my army is composed of primarily of the mono-pose, single piece Night Goblins from Battle of Skull Pass, and I’d already done a fair bit of building last month, all I really had to do this month was rebase… checks notes… 90 goblins! Not really the most exciting process, but a far cry from removing mold lines from and assembling models nearly as old as I am. A simple afternoon and that was done. So now it was time to paint them, right?
Nope! Unfortunately I had some rather personal issues arise that tore through the first three weeks of this month, leaving me both short on capability and motivation for anything hobby related. While I have now begun the long process that is painting a veritable horde of goblins within the past few days, I am not even close to where I had hoped to be. Still, the process has been started, and I hope to have all or most of these basic bobos (gobos?) done by the next update.

Shush on the desk. It’s organized clutter, damnit! Maybe… Now, where did I put that pot of Nuln Oil again…?
Now, progress wasn’t on a complete standstill during the tumultuous early weeks of this month, and I was able to assemble a few further hero models and some unit fillers, mostly comprised of spare bits and the Looncourt models from Warhammer Underworlds. I won’t show those off quite yet though, as I still have a bit of work I want to do on them.
“February” Progress
Now, despite what was stated above, I am not without any work to show off! Between the time of our last post in January, and my unfortunate incident in early February, I was able to get a few more miniatures painted. Firstly, I finished up four more members to join the Squig Hopper unit for the model I showed off in the last update. The other five will come in time…

Furthermore, I was able to get ten Squigs done for a Squig Herder unit. They’ve been let loose! Where are their herders? Well, you’ll hopefully see them next month, so they can round off (or round up) the unit.

And last, but not least, I was able to paint perhaps one of my favorite models from the new Gloomspite Gitz range, the Loonboss on Giant Cave Squig. While he cannot lead my armies in the Old World, he’s still certainly an intimidating presence! The sickle-blade, the mask, the giant squig tongue… Ugh, I just love everything about this model.

Well, that’s it from me! Hopefully I have more to show you all next month. Much more…
Kevin C
So, as this is being posted, I am currently out of my house due to asbestos abatement, so my hobbying availability has certainly taken a hit in recent weeks. That being said, I was able to assemble the entire boxed set of Bretonnians before I left. Here are my thoughts:
The first thing that came to mind was just how much the sprues have changed in the past 20 years. Compare and contrast the two sprues, Men-at-Arms basically unchanged from when they were released back in … checks notes… 1998, and the Lord on Pegasus that was just released.

The tightness of the Lord on Pegasus sprue is definitely more in fashion these days, I assume thanks to the significant advancement in CAD software over the intervening years. I do appreciate the lack of waste that the smaller, tighter sprues offer, but at times they make it hard to cut pieces off the sprue cleanly, due to the weird angles. I have definitely had this problem with some of the newer kits, like the kill teams and this Lord on Pegasus. More on him later…
Knights
The knights were delightfully simple to build. I chose to keep the rider and the shield removed from the horse until after I have painted them, so that I can get to the hard to reach spaces while painting.

Don’t mind the reindeer water mug…
I like keeping helmets on all my models whenever possible. Not because I am bad at painting faces (or, not only because I am bad at painting faces), but it helps to build the uniformity of the unit. I will be differentiating them in different ways, however, mostly through heraldry.
Archers
Don’t get me wrong, I like archers. However, they definitely have the peasant, unclean look. I actually prefer the older monopose archer models from the early 1990s which always looked … healthier to me? Anyway…

It is a good thing we have those stakes and braziers – they are a must for any Bretonnian player. That being said, even though there are tons of stakes with these archer sprues, there are only two 100x25mm bases for them to go on, meaning you can only construct a single unit with stakes. I’m going to see if I can procure more long narrow bases for more stake emplacements.
Men at Arms
So, I’ll be honest, I don’t like the look of these guys. Filthy peasants. That being said, I am so glad Games Workshop made the decision to move all infantry to 25mm bases. These guys can actually finally rank up cleanly. Well, with the exception of the banner knocking the guy behind him in the face. You know, the banner that doesn’t count for VPs for your opponent? Yeah, that one…

Similar to the knights, I have kept the shields off these guys, in order to be able to reach the rest of the miniature behind the shield. On the table, I will probably run these guys as a single large unit, but I ended up building two command sets, just in case.
Duke on Pegasus
Alright, now I’m really going to gripe. This was easily the WORST kit I have ever had to build. The instructions were bad, but I’ve had that before. What really made this kit terrible was two-fold: the miniature itself is hollow (most likely to reduce cost of plastic), and the joins were flat. This means that I have to hold the pieces together, often at weird angles, and they did not want to stay together.


Even after completing the model, instead of feeling a sense of accomplishment of a job well done, I just lifted my hands in disgust and said “good riddance”. I am not entirely confident it will stay glued together through the painting process, namely because the joins are so flipping precarious. As I said, I hated building this model.

Putting It All Together
Well, despite delays in shipping thanks to freak weather in Memphis, and having to deal with unexpected home repairs this month, I was able to build the entire army in the month of February.

My hope moving forward is that I will be able to finish painting a unit for each of our future updates, and given that, should have the entire set done by mid-summer.
Now to wait until nice, low-humidity weather, to be able to prime. Meanwhile…
In Other Hobby News
I was able to finish the rest of my Legions Imperialis miniatures, as well as a pair of Baenblades. I still do not like painting the infantry, but having them all complete is a nice feeling.

I put everything I currently own for Epic together (that has been painted, at least). What kills me is that, it is 20 tanks and 88 infantry bases, and the whole of it only adds up to 1850 points. Still waiting on those aircraft to get back into stock, as well as those support boxes…

I was able to get a good game of Legions in against my buddy Pox a few nights back. He has been printing terrain almost nonstop for the past two months, so he’s got a pretty sizeable and impressive table. I still lost, mostly due to my own mistakes, but it was good to finally put a fully painted army on the table.


Jerry S
February was one of those months in my hobby journey where it felt like I was getting nothing done. Looking back at the pictures of what I worked on this month however, nothing could be further from the truth. While I wasn’t spending my hobby time painting, I was certainly still moving my project(s) along.
After finally getting (most of) my Tomb Kings kits from Games-workshop, I was able to start the long and arduous process of building my skeletons. Michael detailed that terrible process more eloquently than I ever could up above so I will spare you the details.
My goal for the month was to get my “Battleline” built and ready for the painting booth and I am happy to report that I was successful! I actually was able to sneak in a couple Sepulchral Stalkers and some Ushabti as well(not pictured).

All told I’ve assembled 40 skeleton spearman, 20 archers, 20 Tomb Guard, a Casket of Souls and several different character models.
I still have a pile of models to build but I thought this was a good launching point to begin the painting phase. I’ve always been a sucker for teal tomb kings livery. To me, it just works perfectly with white and I had a ton of fun painting different shield designs on each of the warriors. This something I haven’t often done in my hobby history so I took every opportunity to vary the shields here. I already have some more ideas for the second and third batches of spearmen as well so we all have that to look forward to!


While this first block isn’t perfect (I already have some ideas for improvements I want to make), I am happy to have locked in my scheme and I am sure to refine it over the next…100 skeletons….
In other hobby news, after many years of wishing and wanting, I finally decided to snag a PLA printer. I grabbed the P1S after seeing the incredible results one of my friends was getting from his and I am absolutely in love with this machine. I’ve only had it a week but I have been testing and printing at a furious pace.

The main reason I bought this printer was to print terrain for my various game systems and to test it out I printed the below tower and cottage. As you can see the detail is outstanding and the setting I used were more “fast and dirty” than I would use going forward so I have high hopes as I learn how to use this amazing tool.

One of the main draws for Legions Imperialis for me is the ability to create the truly epic landscapes that we all imagine our battles to be fought. The next couple pictures are some proof of concepts for an industrial spaceport board that I plan on printing, building and painting ahead of a Legions Imperialis campaign this summer.


While I did not get as much final product done this month as I would’ve liked, there is no denying that I got a lot of work done. I hope to get some more finished minis out in March though. My goal as of today is to get my block of 20 Tomb Guard finished, quickly followed by a character or two from my tomb kings. After that I hope to get some paint on some Legions Imperialis titans as I wait for jetbikes to release.
Finally, I am hoping to keep up the pace with printing, I have a ton to learn with CAD and I hope to get some epic terrain pieces out here in the coming months.
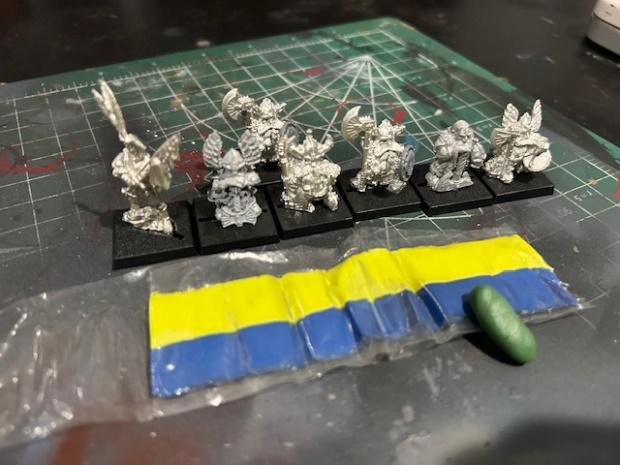
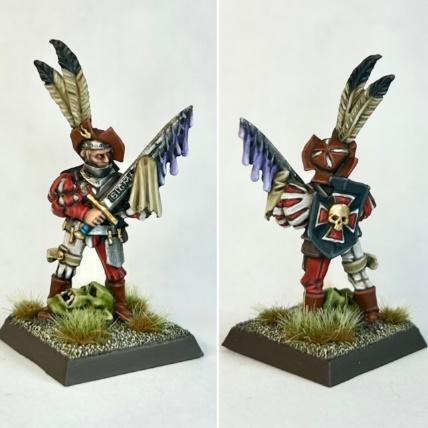
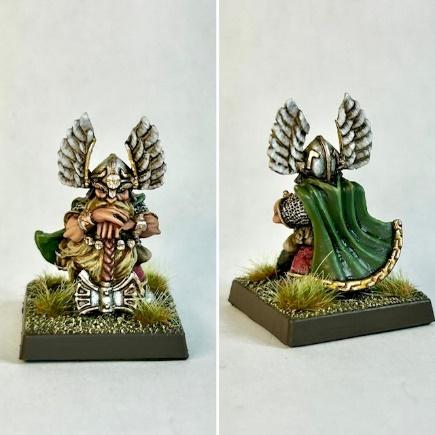
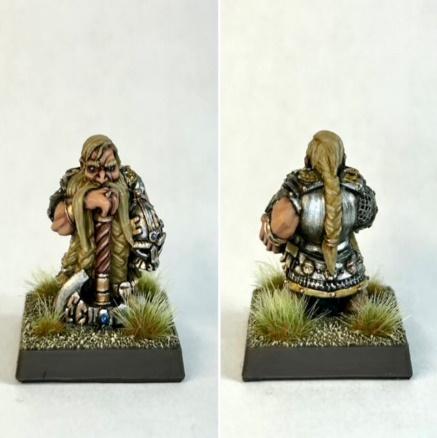
Mike P. – https://www.instagram.com/middleearth_mike/
An Epic Saga of Mike’s Miniatures
Oldhammer Heroes
It’s been quite the month, albeit with precious few hours to dedicate to my hobbies. Work, life, you know how it goes…
However, amidst the hustle and bustle, I’ve managed to make some progress on my builds and put paint to a few models. In today’s article, I’m excited to showcase some of these creations along with the meticulous steps from inception to completion.
Currently, my focus lies predominantly in the realm of the Old World. There’s a certain charm to those aged metal GW sculpts, each one brimming with character even after two decades.
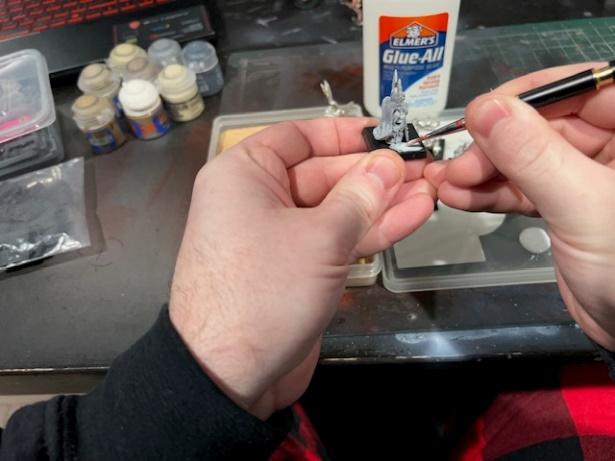
Following the assembly of the models—admittedly less labor-intensive with metal ones—I embark on a methodical assembly line process. Any gaps within the bases are deftly filled with green stuff (special thanks to Jerry for supplying me with this same line of green stuff a few years back). This meticulous step ensures a seamless finish, ready for the application of texture, typically sand, onto the base. Once the green stuff has set, I meticulously apply a uniform coat of PVA glue onto the base before plunging it into my sand pit. Though this entire process can span about an hour, the crucial point lies in allowing ample time for the sand and PVA glue to fully cure before progressing to priming.
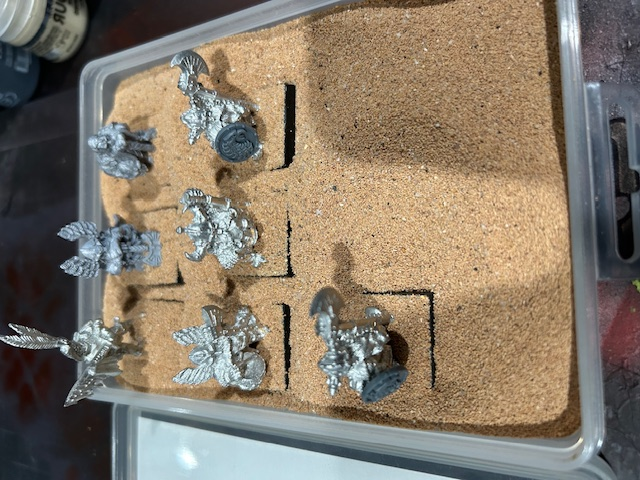
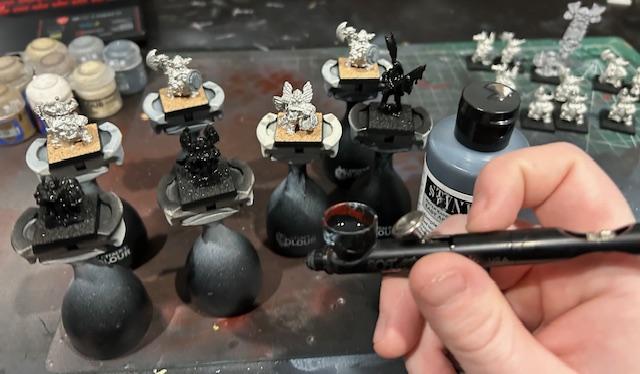
Once the sand has fully set, the model is primed and ready for the next stage. For priming, I rely on “Stynylrez” primer applied through an airbrush, ensuring a flawlessly even coat. Gone are the days of struggling with old rattle cans, where achieving the pristine flatness I desired seemed like an elusive feat. Given the material of these models, multiple layers of primer are essential to guarantee a solid coat, a meticulous process that demands patience and attention to detail. I can’t count the number of models I’ve had to abandon due to botched priming attempts, underscoring the importance of taking the time to get it right.
Once the primer has fully cured and every layer is meticulously covered, it’s time to dive into the exciting realm of painting. My approach to painting involves a blend of simple yet labor-intensive techniques, including basecoats, washes, layering, and highlights. It’s a methodical process that demands patience and attention to detail. With each miniature, I find myself investing hours, ensuring that every brushstroke contributes to the final masterpiece. While this meticulous approach may result in slower progress, the end result is undeniably worth it.
In the past, I’ve experimented with prioritizing quantity over quality, rushing through projects in an attempt to churn out as many miniatures as possible. However, I’ve come to realize that the depth of my affection for a model is directly proportional to the time and effort I invest in it. The miniatures that receive the full extent of my attention and care hold a special place in my heart, each one a testament to the passion and dedication poured into its creation.


Introducing a recent addition to my painting arsenal: the two thin coats paint range. In fact, I dove headfirst into this new venture, acquiring the entirety of wave two and half of wave one without hesitation. Let me tell you, these paints have exceeded my expectations in every aspect. Their smooth consistency and vibrant pigmentation seamlessly complement my existing Citadel paints, resulting in a harmonious blend ideal for layering and highlighting techniques.
After numerous painstaking hours of meticulous brushwork, I proudly unveiled the final iteration of the three models I had been diligently working on. The culmination of this laborious process revealed a level of detail and depth that truly surpassed my initial aspirations.
As you can see, we are all hard at work over here at Urban Cowboy Hobbies and I can honestly say the best is yet to come for each of our warlords. Stay tuned as each of us keeps moving forward with our hobby goals and I hope that we have motivated y’all to get after it yourselves.
Adios,
Jerry
